Basic Life Support (BLS) Guidelines: A Comprehensive Overview
Have you ever thought about what you would do if someone around you suddenly collapsed and couldn’t breathe? Every year, about 350,000 sudden cardiac arrests occur outside of hospitals in the United States, with nearly 90% of them resulting in death without immediate intervention. Basic Life Support (BLS) provides essential lifesaving techniques that anyone can learn and use in such emergencies.
BLS is not just for healthcare professionals; it’s designed for everyday people who want to be prepared to help in critical moments. It involves simple steps like chest compressions, rescue breaths, and the use of an Automated External Defibrillator (AED) to keep someone alive until professional medical help arrives. Knowing how to perform BLS can double or even triple a person’s chance of survival during a cardiac emergency.
By the end of this blog, you will understand the BLS guidelines. You’ll also find detailed instructions on how to perform chest compressions and rescue breathing, and guidance on how to help infants, children, and adults who are choking.
Introduction to Basic Life Support
BLS is about providing help in situations where someone’s heart has stopped, or they can’t breathe. It’s a system of steps that can keep oxygen flowing to the brain and heart. The quicker BLS is started the better the person’s chance of survival. The key components of BLS are:
Check for Safety: Before helping someone, make sure the area is safe for both you and the person. For example, you wouldn’t want to help in a place with heavy traffic or electrical hazards.
Assess Responsiveness: Gently tap the person and shout to see if they respond. If they don’t move or speak, they may need immediate help.
Call For Emergency Services: Always call for help as soon as you realize someone needs assistance. Use your phone or ask someone nearby to call.
Check For Breathing And Pulse: Quickly check if the person is breathing or has a pulse by placing two fingers on the side of the neck. Don’t spend more than 10 seconds doing this.
Start CPR: If there is no breathing or pulse, immediately begin chest compressions followed by rescue breaths.
Chain of Survival
The “Chain of Survival” is a series of actions that increase the chances of survival for someone who is experiencing a cardiac arrest (heart stops beating). Each link in the chain is important for giving the best chance of saving a life. The steps included in the chain of survival are:
Immediate Recognition of the Problem: If someone suddenly collapses, loses consciousness, or stops breathing, bystanders must recognize the emergency that needs fast action.
Early CPR: Start CPR right away. Every minute without CPR reduces the chances of survival. You can start chest compressions to keep the blood flowing to the brain and heart.
Rapid Defibrillation: Use an AED (Automated External Defibrillator) as soon as possible. This device sends an electric shock to restart the heart’s normal rhythm.
Advanced Medical Care: Once professional help arrives, they can provide advanced treatment, such as oxygen and medications to stabilize the person.
Post-cardiac arrest care: After the heart has been restarted, ongoing care is needed to ensure the person fully recovers. This includes hospital care and monitoring.
BLS guidelines are a set of life-saving techniques that can help someone whose heart or breathing has stopped. These include actions like CPR, using an AED, and relieving choking. Knowing these steps can help save a life in emergencies like cardiac arrest, drowning, etc.
Cardiopulmonary Resuscitation (CPR)
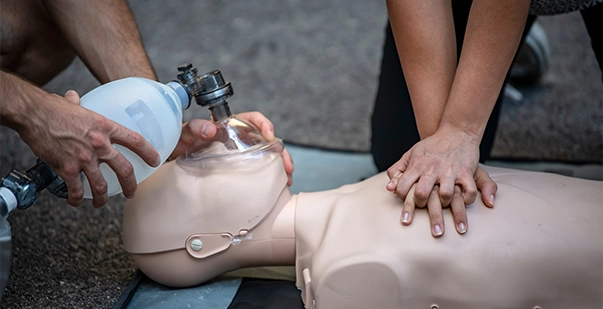
Cardiopulmonary Resuscitation (CPR) is one of the main actions in BLS. It involves chest compressions and rescue breaths to keep blood and oxygen moving through the body. CPR should be started immediately when someone’s heart stops or they stop breathing.
Chest Compressions: Push hard and fast on the center of the chest, pushing down about 2 inches to help pump blood to the vital organs.
Rescue Breaths: After 30 compressions, you need to take 2 breaths by tilting your head back and blowing air into your mouth.
Continue Until Help Arrives: CPR should be continued until medical professionals arrive or the person starts breathing again on their own.
How to Perform Chest Compressions
Chest compressions are the most important part of CPR because they manually pump the heart when it isn’t working. To perform chest compressions properly, follow these steps:
Position Your Hands: Place the heel of one hand in the center of the person’s chest (on the lower half of the breastbone), and put your other hand on top of the first hand.
Push Hard And Fast: Use your upper body strength to press down at least 2 inches deep into the chest. The compressions should be done at a speed of 100-120 per minute, like the beat of the song “Stayin’ Alive.”
Let the Chest Rise Fully Between Compressions: After each compression, release the pressure to let the chest rise again. This allows blood to fill the heart again before the next compression.
Rescue Breathing
Rescue breathing is an important part of CPR because it helps provide oxygen to someone who isn’t breathing. When a person’s breathing stops, their brain and other organs are deprived of oxygen, which can cause serious damage or death. Here’s how you give rescue breaths:
Open the Airway: Lift the chin and tilt the head back slightly to open the airway. This helps ensure the air you give will go into their lungs.
Pinch the Nose Shut And Seal Your Mouth Over Theirs: Pinching the nose ensures that the air goes into the lungs and doesn’t escape through the nose.
Give Two Breaths: Each breath should last about 1 second, and you should see the chest rise with each breath. If the chest doesn’t rise, reposition the head and try again.
Using an Automated External Defibrillator (AED)
An AED is a device that can restart a person’s heart by delivering an electric shock. It’s simple and talks you through each step, making it easy for anyone to use. AEDs are commonly found in public places like airports, schools, and malls.
Turn on the AED: Most AEDs will have a button or switch to turn it on. The device will start giving you instructions right away.
Apply the pads to the person’s chest: AED pads have pictures on them to show you where to place them. Usually, one pad goes on the upper right side of the chest and the other on the lower left side.
Follow the AED’s instructions: The AED will check the person’s heart rhythm and tell you whether or not a shock is needed. If a shock is necessary, make sure no one is touching the person and press the shock button.
Infant and Child BLS
Basic Life Support (BLS) for infants and children is similar to adult BLS, but it requires some adjustments. Children and infants have smaller, more fragile bodies. Thus, the techniques need to be gentler.
Chest Compressions For Children: For children (ages 1-8), use one hand to perform compressions. Push down about 2 inches on the chest, and do this at a rate of 100-120 compressions per minute.
Chest Compressions For Infants: For infants (under 1 year old), use two fingers placed in the center of the chest. Push down about 1.5 inches deep, and also do this at 100-120 compressions per minute.
Rescue Breaths: Be gentle with rescue breaths for children and infants. Their lungs are smaller, so they give just enough air to raise the chest.
Choking Relief
Choking happens when something blocks a person’s airway, making it hard or impossible for them to breathe. BLS guidelines include simple techniques to help someone who is choking.
Signs of Choking: The universal sign of choking is clutching the throat. If someone is unable to speak, cough, or breathe, they are choking and need help immediately.
Abdominal Thrusts (Heimlich Maneuver): Stand behind the person, place your fist just above their belly button, and press inward and upward sharply. Repeat this until the object blocking the airway is expelled.
Back Blows And Chest Thrusts For Infants: For infants, give 5 back blows by slapping between the shoulder blades, followed by 5 chest thrusts using two fingers.
Early Use of Epinephrine
Epinephrine (adrenaline) is a medication that can help restart the heart in certain cases of cardiac arrest, especially when caused by shockable rhythms like ventricular fibrillation.
According to BLS guidelines, administering epinephrine as early as possible in the resuscitation process can improve the chances of survival. In advanced life support, it’s recommended to give epinephrine every 3-5 minutes during resuscitation efforts, but early administration is key for the best outcome.
Intravenous Access Preferred Over Intraosseous
When it comes to administering medications like epinephrine during CPR, intravenous (IV) access is the preferred method. This allows for faster and more efficient drug delivery directly into the bloodstream. However, if IV access is difficult or takes too long to establish, intraosseous (IO) access, which involves injecting medication into the bone marrow, is used as an alternative. While IV is preferred, IO is a reliable option in emergencies.
Steps to Choose The Right BLS Course
Choosing the right Basic Life Support (BLS) course is important to ensure you get proper training. To choose the right course, you need to look for the accreditation, course content and format, etc. Here are some steps to help you make the best choice:
Look for Accredited Courses: Make sure a reputable organization accredits the course. Accreditation ensures that the course follows the latest guidelines and offers high-quality training.
Check the Curriculum: Review what the course covers. A good BLS course should include CPR, AED usage, rescue breathing, and techniques for both adults and children. It should also provide hands-on practice with a mannequin.
Consider the Format: Decide if you prefer in-person or online training. Some courses offer a blend of both, with online lessons and an in-person skills test. In-person courses offer more hands-on experience, while online options are flexible and convenient.
Look at the Certification Validity: Find out how long the certification is valid. Most BLS certifications last for two years, after which you’ll need to renew it.
Read Reviews and Ask for Recommendations: Look for reviews from previous students to gauge the quality of the course. You can also ask friends, colleagues, or healthcare professionals for recommendations.
Wrapping Up
Staying updated with BLS guidelines can save a person’s life in emergencies like cardiac arrest, drowning, or choking. By learning and following BLS guidelines, you can keep blood and oxygen flowing to vital organs until professional help arrives. The key steps, including CPR, rescue breaths, using an AED, and helping those who are choking, are simple but powerful techniques that anyone can learn. BLS training prepares you to take action confidently when someone’s life is at risk.
BLS is not just for healthcare workers—it’s for everyone. Knowing how to help in emergencies can make you a valuable first responder in your community, at home, or work. Remember, your quick actions could save a life.Don’t wait for an emergency to strike. Get trained in Basic Life Support (BLS) today to be prepared when it matters most. Look for accredited courses near you or online, and start learning these essential skills now!
Quick, Reliable BLS Certification
BLS course designed for fast learning and real-life application.