
How to Check Your Pulse: Methods, Tips & Results
Mar 28, 2026
Last Updated On: February 9, 2026
An Automated External Defibrillator (AED) is a device that can help save lives during sudden cardiac arrest (SCA). SCA occurs when the heart suddenly stops beating properly, and it can happen to anyone at any time. An AED can analyze the heart’s rhythm and deliver a shock to restore normal heart function.
Every year, around 300,000 to 450,000 people in the U.S. suffer from out-of-hospital cardiac arrest. Survival rates drop significantly for every minute that passes without defibrillation. Research shows that using an AED within the first few minutes of cardiac arrest can increase a person’s chance of survival by up to 49–75%.
Knowing how to use an AED can make you a crucial first responder in emergencies. In the following sections, we’ll guide you through the steps of using an AED, ensuring you’re ready to act if the need arises.
AEDs are user-friendly devices created for use by the general public to treat sudden cardiac arrest (SCA). SCA occurs when the heart’s electrical system malfunctions, causing the heart to stop pumping blood effectively. If not treated promptly, this can lead to death within minutes.
AEDs are crucial tools that can help by delivering an electric shock to restore the heart’s normal rhythm. They are user-friendly and designed for use by people with minimal medical training.
Get CPR Certified Today
Learn essential life-saving skills with our certified CPR course
When someone experiences sudden cardiac arrest (SCA), their heart’s electrical system is disrupted, causing it to beat irregularly or stop altogether. An AED is designed to quickly detect these dangerous rhythms and deliver a shock to restore a normal heartbeat. Understanding how AEDs work is key to using them effectively in emergencies.
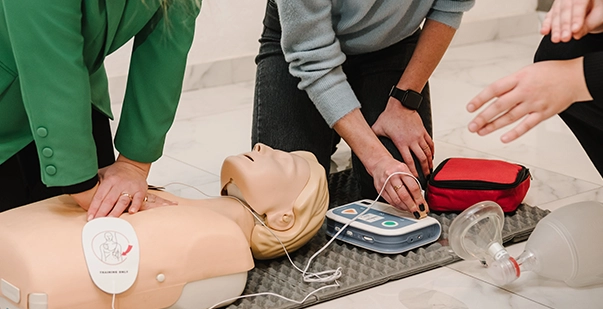
If you’re unsure how to use AED, remember that the device will guide you step by step with clear instructions. AEDs are designed to be user-friendly, even for those with no medical training. Below are the essential AED steps to follow:
AEDs are designed to be used on people of all ages, but there are specific guidelines for infants, toddlers, and adults. The heart size, skin thickness, and body structure vary significantly between infants, toddlers, and adults. Therefore, first-care responders must have all the information.
| Age Group | Age Range | Electrode Pad Placement | Shock Level | Special Considerations |
| Infants | Under 1 year |
Place one pad in the center of the chest (front) Place the other pad on the back, between the shoulder blades. |
Reduced (pediatric) shock level | Use pediatric pads if available.If pediatric pads are not available, use adult pads but ensure they do not overlap.Perform CPR while waiting for the AED analysis. |
| Toddlers | 1-8 years | Place pads as indicated on the pads: one on the upper right chest and the other on the lower left side. | Reduced (pediatric) shock level | Use pediatric pads if available.If pediatric pads are not available, adult pads can be used.Ensure pads do not touch or overlap.Continue CPR as instructed. |
| Adults | 8 years and older | Place one pad on the upper right chest and the other on the lower left side of the chest. | Standard (adult) shock level | Use adult pads.Follow the AED prompts for CPR and shock delivery.Ensure good contact between pads and skin, removing any excess chest hair if needed. |
Sudden cardiac arrest (SCA) can happen unexpectedly, and the chances of survival drop quickly without quick action. An Automated External Defibrillator (AED) is a crucial device that can restore a normal heartbeat during these emergencies. Here are some key reasons why AEDs are important and how they save lives during cardiac emergencies.
To maximize their life-saving potential, Automated External Defibrillators (AEDs) should be easily accessible in locations where sudden cardiac arrest (SCA) is most likely to occur. Here are key places where AEDs should be placed:
| Category | Specific Locations | Placement Details |
| Public Spaces |
Airports and Train Stations Shopping Malls Stadiums and Arenas |
High foot traffic areas Central locations Near entrances, exits, and seating areas |
| Workplaces | Offices and Factories Construction Sites | Common areas (lobbies, break rooms, near emergency exits) Close to work areas with physical exertion |
| Educational Institutions | Schools and Universities Daycares and Preschools | Near gymnasiums, cafeterias, and main offices Centrally located for quick access |
| Health and Fitness Centers | Gyms and Sports Facilities | Near workout areas, pools, and entrances |
| Residential Communities | Apartment Complexes Senior Living Facilities | In lobbies or common areas Central locations accessible to residents and staff |
| Public Safety Vehicles | Police Cars and Fire Trucks | For rapid response during emergencies |
| Community Centers |
Libraries Churches Recreation Centers |
In easily accessible public areas |
In an emergency where sudden cardiac arrest (SCA) occurs, every second counts. An Automated External Defibrillator (AED) is a critical tool that can help restore a normal heart rhythm and significantly increase the chances of survival.
By knowing how to use an AED, you can provide immediate assistance and potentially save a life. Thus, enrolling in an AED course can give you the confidence to respond effectively in a cardiac emergency.
Read More:
Subscribe
Search Here
Select Courses
Recent Posts

How to Check Your Pulse: Methods, Tips & Results

Snake Bites – First aid, Treatment and Symptoms
Categories